Cleaning Particular Equipment
Cleaning advice for specific equipment is as follows:
- Facemasks (reusable), oropharyngeal and nasopharyngeal airways
- Tracheal tubes and reusable laryngeal mask airways
- Laryngoscopes
- Self-inflating bag
- 'Gum elastic' bougie
- Suction tubing, Yankauer suction, suction catheters
- Airway trolley
- Fibreoptic laryngoscope:
Facemasks (reusable), oropharyngeal and nasopharyngeal airways
If facemasks have a cap on the inflation valve, remove before cleaning.
|
Decontamination |
Cleaning |
Disinfection |
Sterilization |
| Soak in 0.5% chlorine solution for 10 minutes |
Wash with soap and water Rinse with clean water Air dry or dry with clean towel |
Immerse in 70% alcohol for 10 minutes or boil at 100oC for 20 minutes | Autoclave |
Tracheal tubes and reusable laryngeal mask airways
Manufacturers normally recommend only reusing LMAs 40 times
|
Decontamination |
Cleaning |
Disinfection |
Sterilization |
| Soak in 0.5% chlorine solution for 10 minutes |
Wash with soap and water, using a brush which fits inside the tube |
Immerse in 70% alcohol for 10 minutes | Autoclave |
Laryngoscopes
The laryngoscope handle should be cleaned the same way as the blade, because the blade often touches the handle and contaminates it with blood or secretions. First, disconnect the laryngoscope blade and handle. Some laryngoscope bulbs need removing before cleaning, so check manufacturers instructions. Most laryngoscopes require removal of the batteries before cleaning.
|
Decontamination |
Cleaning |
Disinfection |
Sterilization |
| Be careful not to soak laryngoscopes for more than 10 minutes in chlorine as it can damage the metal. Some people go straight to cleaning |
Using a brush (a nailbrush is good), wash with soap and water Then rinse with water and air dry or dry with towel Package them if they are to be sterilized |
70% alcohol for 10 minutes then rinse well with boiled water and air dry Or boil in water at 100oC for 20 minutes Or 2% glutaraldehyde for 20 minutes |
Autoclave (do not exceed a temperature of 138oC otherwise the laryngoscopes may be damaged) Or ethylene oxide Do not use dry heat – it is too hot |
Self-inflating bag
- Remove and discard oxygen tubing
- Disconnect and process the facemask separately
|
Decontamination |
Cleaning |
Disinfection |
Sterilization |
|
Wipe outside with 0.5% chlorine solution Or wipe with a gauze pad soaked in 70% alcohol Then rinse immediately |
Wash with soap and water If the valves come apart, clean those in warm soapy water, and let them dry |
2% glutaraldehyde for 20 minutes recommended |
Autoclave |
'Gum elastic' bougie
- Manufacturers recommend that they are reused no more than five times
- Bougies and their containers have been found to carry a number of bacteria and viruses. So, the bougie should be kept in a closed container until it’s use, and this container must have been disinfected or sterilised
|
Decontamination |
Cleaning |
Disinfection |
Sterilization |
|
Soak in 0.5% chlorine solution |
Wash with water and soap |
2% glutaraldehyde for 20 minutes |
No |
Suction tubing, Yankauer suction, suction catheters
|
Decontamination |
Cleaning |
Disinfection |
Sterilization |
|
Soak in 0.5% chlorine solution |
Wash with soap until free of visible dirt. Use narrow brushes to go into suction tubing and suction catheters If suction catheter looks dirty after cleaning, discard and do not proceed with disinfection |
Immerse in 70% alcohol for 10 min |
Autoclave |
Airway trolley
|
Decontamination |
Cleaning |
Disinfection |
Sterilization |
|
Wipe with 0.5% chlorine |
Then wash with soap and water if visible dirt |
No |
No |
First stage cleaning and testing for leaks
Follow the manufacturer’s guidelines for your fibreoptic scope Training is advised before cleaning these scopes as they are easily damaged.
|
Decontamination |
Cleaning |
Disinfection |
Sterilization |
|
Wipe the scope with a 70% alcohol wipe or gauze pad |
Then suction clean water and air up through the suction port to prevent drying of secretions inside the scope (it doesn’t need to be sterile water as the scope will later be disinfected). Remove all detachable parts (suction port, light source) and soak them in a detergent solution. Put a cover/cap on the scope at the place where the light source was removed. This will protect the scopes metal connections. |
No |
No |
The scope should now be tested for leaks prior to immersing it in disinfectant. This is important because if there is a leak (caused by damage to the scope), more of the patient’s secretions will stick to around the leak site. This would increase the risk of transmitting infection to the next patient.
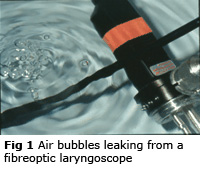 Pressurized air
is connected to the suction port and then the scope is put under water.
If bubbles are seen, as in Fig 1, it’s because there is a leak, and the
scope should not continue being cleaned, but should be sent for repair.
If there is no leak, cleaning can continue.
Pressurized air
is connected to the suction port and then the scope is put under water.
If bubbles are seen, as in Fig 1, it’s because there is a leak, and the
scope should not continue being cleaned, but should be sent for repair.
If there is no leak, cleaning can continue.
Second stage cleaning and storage
|
Decontamination |
Cleaning |
Disinfection |
Sterilization |
| Already done prior to leakage check |
Cleaning can be either manual or automatic (but avoid ultrasonic cleaners) Immerse in an approved detergent which is then flushed through all the ports. This detergent should not be re-used All ports should be brushed with a small brush and then repeat flushing of detergent through them The brushes should be sterile or disinfected Rinse outside the scope and all ports (tap water is sufficient for this in-between rinsing stage) |
Normally disinfection is adequate Place the scope in a basin of 2% gluteraldehyde Immerse for 30 minutes (or 3 hours to kill spores). Then the scope is rinsed with sterile or filtered water (filtered with 0.2 μm filter) depending on its next intended use Then dry thoroughly (ideally with compressed air) before storage |
Fibreoptic scopes cannot be autoclaved Ethylene oxide is effective but takes a long time |
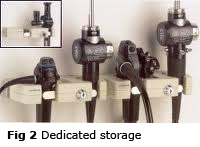
Store vertically in a dedicated cupboard (Fig 2). If this equipment is carried anywhere, it should be in a sterile bag.